How to
Adjust a Cover
making modifications to the cover once it arrives
One of the main features of our covers is the ability to heat form the cover once it arrives. This is especially helpful for fitting below knee patients, as the contours of sockets vary from person to person. We are going to walk you through how to make a heat modification without affecting the appearance of the cover.
Please note that this guide is meant for industry professionals using trade equipment. If you are looking to make modifications to your own cover, please reach out to us prior to making any adjustments – or chat with your prosthetist if they ordered the cover on your behalf!
heat forming
Our covers are made of ABS plastic and can be modified by spot heating. This is especially helpful for below knee covers. When following the instructions below, always remember – low and slow:
1. Put the cover on the Prosthesis and do up the straps. This will let you see if there are any gaps you would like to heat adjust. In this example, the cover fits well out of the box, but it would be great to get the top of the cover to fit right up against the socket.
2. Be sure to take the straps out before making any heat adjustments. The polyurethane straps can potentially start to melt if they are left in the cover.
3. Place the cover back on the socket in the same location as before. Notice the gap that you want to adjust looks about the same as it did with the straps in.
4. When making heat adjustments, always work with smaller sections. You should only be working with a 2 or 3 inch section at a time. The goal should be making smaller modifications to perfect the fit, not changing the overall shape of the cover.
5. It is very important to keep the heat gun moving, and to keep some distance between the gun and the cover.
Staying in one spot too long, or having the gun too close can affect the finish of the cover, and could cause the paint to bubble.
6. Before applying heat, it can be beneficial to get a feel for the plastic with your bare hand to gauge the resistance of the cover. Once the cover is heated, you will be able to feel it become more pliable.
7. It is important to always wear work gloves when doing heat modifications. We are heating the cover to 210F – 230F, and you can burn your hands if you are not wearing proper protection.
8. Using a digital heat gun, set the temperature to 700F. At this temperature you can quickly heat the surface of the cover to approx. 210F – 230F.
9. After heating the cover for about 20 seconds, press down with your hands and you will feel the cover is slightly pliable. Hold the cover to the socket for 30 seconds or so to let the heat dissipate and allow the cover to reshape.
10. Repeat these steps as needed, until the gap between the cover and the socket is gone.
11. After the cover has cooled, put the straps back in, and strap the cover back on to your client’s socket 🙂
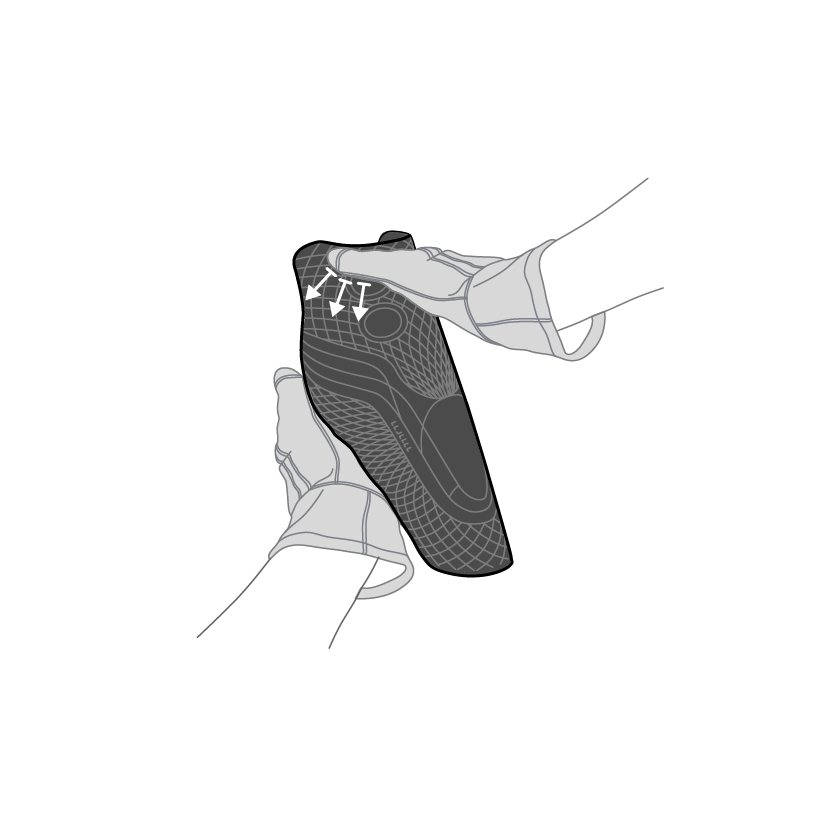
Small Heat-forming Modifications

Step 1: Using Heat Gun
• Take cover off and remove straps
• Heat a small section for approximately 10 seconds to get the surface temperature of the cover to 210-220 F (this temperature will not effect the paint)
• The cover will become slightly pliable
Step 2: Hand Forming
• While wearing proper gloves, apply pressure to heated area
• Hold until cover cools (approximately 1 minute)
Large heat-forming modifications
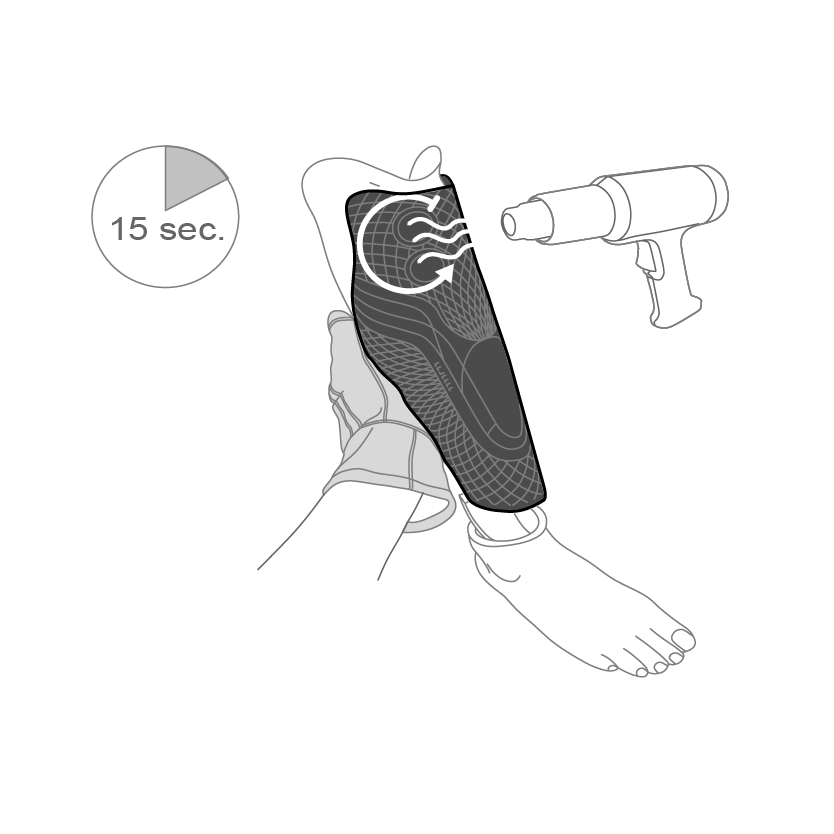
Step 1: Using Heat Gun
• Remove straps
• With cover on prosthesis, heat top 3 inches for approximately 15 seconds. This should get the surface temperature of the cover to 220 -230 F – the cover will become slightly pliable
• Keep the heat gun moving for even heating and to ensure the paint won’t bubble
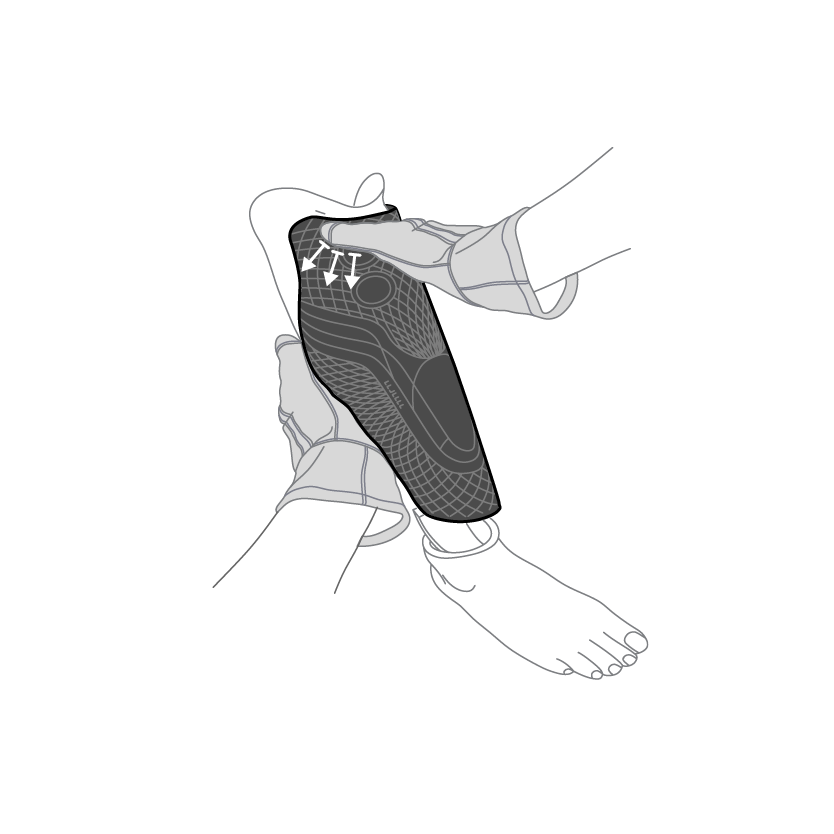
Step 2: Hand Forming
• While wearing proper gloves, apply pressure to heated area, using the socket as a ‘mould’
• Hold until cover cools (approximately 1 minute)
trimming
One adjustment not covered in this video is the ability to trim the covers. You can easily grind, file or trim the edges of the cover to accommodate varied socket geometries and components. Remember, if there is a design on the cover the closer you get to the artwork, the more fragile the cover may become.
We highly suggest leaving as much of the border as possible. Always feel free to reach out to us before placing the order, or for consultation once it arrives.
drilling release valves
In order to accommodate release valves or expulsion buttons we require an additional measurement that lets us know the general area of where an access hole needs to be drilled. When you provide the general area of the button, we will adjust the artwork to remove the cutouts while preserving the design. This will allow you to drill the hole in the exact location your client needs in order to don or doff their leg with ease, and treats the hole in a way that does not detract from the appearance or overall strength of the cover. Creating an access is best done on site because there is no reliable way for us to predict how the cover will sit on each individual prosthesis.
Even the best measurements mean that any release valve access created remotely may not translate to the correct spot on the cover.
Notice how drilling into unadjusted artwork not only creates sharp edges, it also reduces structural support around the access hole which sacrifices the integrity of the cover. In this example, the second design has been adjusted for a release access. Notice how the artwork in this area has been made solid, so that even when the access is drilled into the cover, the strength and structure remains intact.